
A stock concentration can be mathematically correct and still be wrong for an assay. When calculating peptide concentrations for assays, the result depends on more than the mass weighed and volume added. You also need to interpret the vial’s stated content, peptide purity and molecular weight correctly.
If converting milligrams to micromolar or planning a serial dilution feels easy to get wrong, that concern is justified. Mass concentration and molar concentration describe different things. Using gross powder weight as the peptide amount may overstate the concentration when water or counterions contribute to the vial’s mass.
This guide sets out a practical, traceable workflow for calculating stock and working concentrations with consistent units. It covers conversions between mass and molar units, dilution planning, and the product details to verify before starting, including net peptide content, molecular weight, salt form and batch documentation. The aim is to make the arithmetic clear and the assumptions visible, so assay preparation is easier to review and reproduce.
Key Takeaways
- Distinguish mass concentration from molar concentration before choosing units for your assay calculations.
- Calculate stock concentration using peptide mass and final solution volume, keeping units consistent throughout.
- Use C1V1 = C2V2 to plan dilutions, and make sure both volumes use the same units.
- When calculating peptide concentrations for assays, verify net peptide content and molecular weight instead of treating purity and peptide amount as equivalent.
- Record source details, assumptions and final concentration, and follow validated research protocols for peptide-specific preparation.
What does peptide concentration mean in an assay?
Peptide concentration is the amount of peptide in a defined volume of solution. In laboratory assays, distinguish how that amount is expressed and which preparation stage the value describes. Start by checking the protocol’s units and concentration labels.
Mass concentration expresses peptide mass per solution volume, while molar concentration expresses the number of moles per volume. They describe the same solution in different ways, but you need a molecular-weight conversion to move between them. These examples apply to laboratory research assays only, not human use or administration.
Mass concentration and molar concentration are not interchangeable
Common mass-concentration units include mg/mL, µg/mL and g/L. Molar concentration is expressed in mol/L, often written as M, or in micromoles per litre, written as µM. For a concise chemistry reference, see Molar concentration.
To convert mass concentration to molar concentration, divide the mass concentration in g/L by the confirmed molecular weight in g/mol. The result is mol/L. For example, if a hypothetical peptide has a molecular weight of 2,000 g/mol, a solution at 1 g/L corresponds to 0.0005 mol/L, or 500 µM. This is an illustrative conversion, not a product specification.
Use a molecular weight that matches the peptide being used. Sequence, chemical modifications and salt form can affect the value. Check the relevant product or batch records instead of relying on an assumed molecular weight.
Which concentration does an assay protocol specify?
Protocols may specify a stock concentration for the prepared source solution, a working concentration for an intermediate dilution, or a final concentration for the assay mixture. A per-well concentration generally refers to the concentration after the specified components have been combined, but confirm the protocol’s definition.
Check whether the stated value applies before or after sample addition. Adding sample to an existing assay volume changes the total volume and can therefore change the final concentration. Don’t treat the stock or working concentration as the per-well value unless the protocol explicitly says they are the same.
Assay-specific instructions determine which concentration matters and how to prepare it. Record the preparation stage alongside the value and units. This makes calculations easier to review and helps prevent a correct stock calculation from being mistaken for the assay’s final concentration.
How to calculate peptide stock concentration from mass and volume
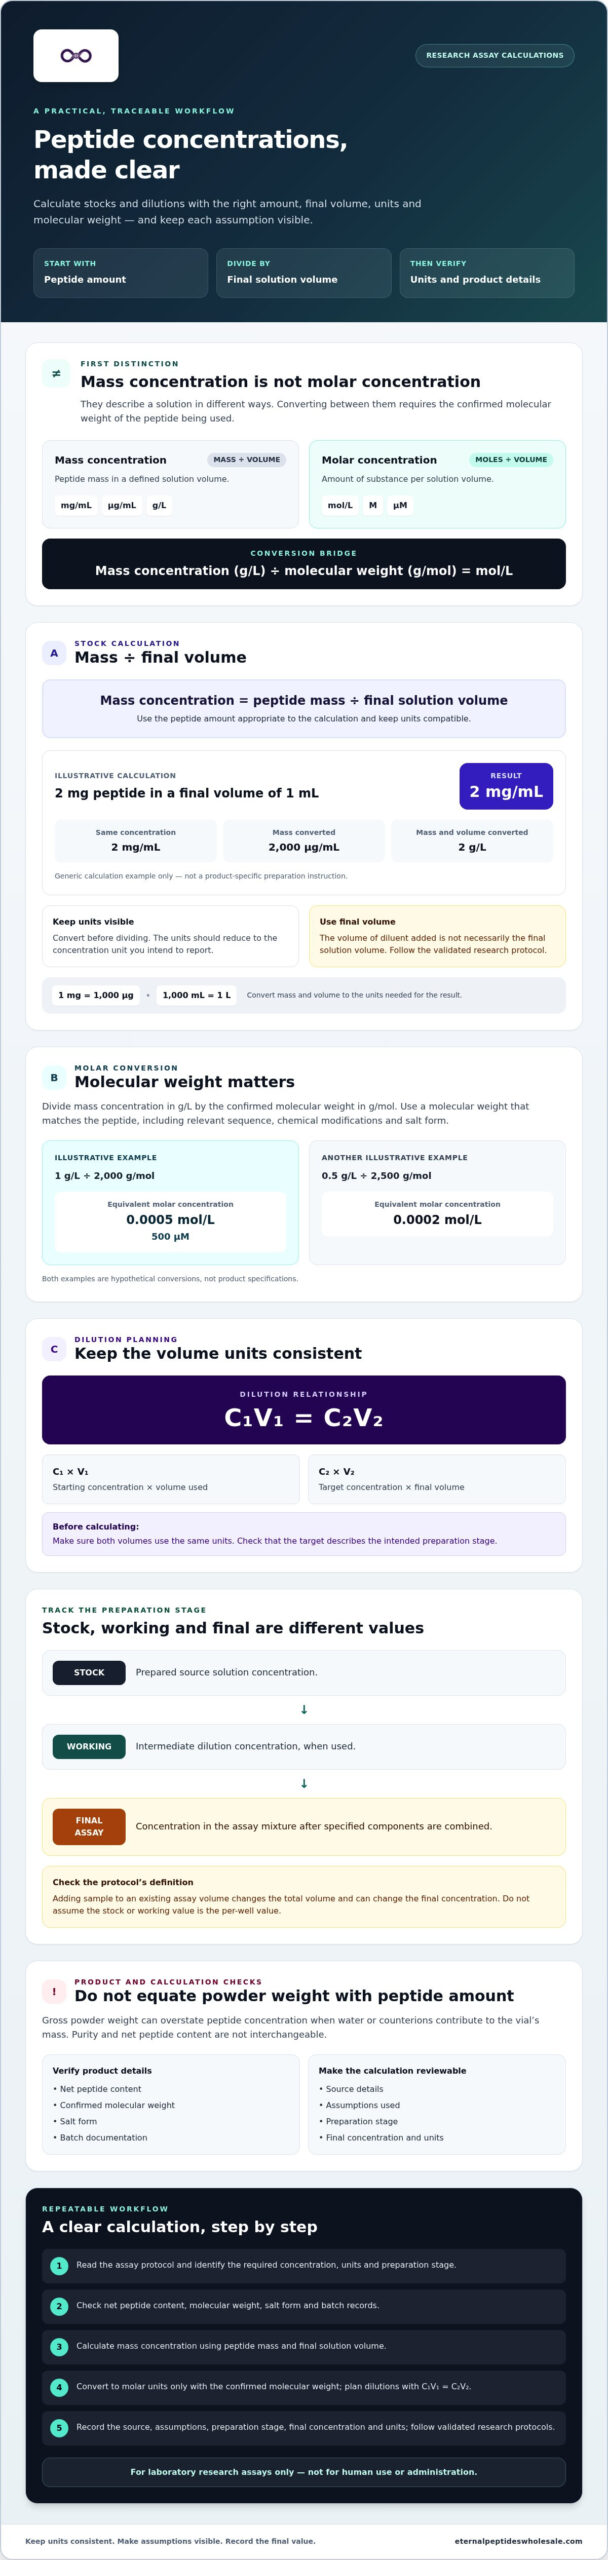
For a stock solution, calculate mass concentration by dividing peptide mass by the final solution volume:
Mass concentration = peptide mass ÷ final solution volume
Use the peptide amount appropriate to the calculation, and express mass and volume in compatible units. For example, if an illustrative preparation contains 2 mg of peptide in a final volume of 1 mL:
- 2 mg ÷ 1 mL = 2 mg/mL
- 2 mg = 2,000 µg, so the concentration is also 2,000 µg/mL
- 2 mg = 0.002 g and 1 mL = 0.001 L, so the concentration is 2 g/L
These are equivalent expressions of the same mass concentration. This generic example is for calculation practice only, not a product-specific preparation instruction.
Convert mass and volume before dividing
Keep the units visible at each step instead of converting mentally. One milligram equals 1,000 micrograms, and 1,000 millilitres equal 1 litre. To report a result in g/L, for example, convert the mass to grams and the volume to litres before dividing. The units should reduce to the one you intend to report, such as mg/mL or g/L.
Distinguish the volume of diluent added from the final solution volume. If powder contributes to the total volume, adding a measured volume of diluent does not necessarily produce that same final volume. Use the final volume specified by the validated research protocol. Before accepting the result, check that the denominator is the intended final volume and that the calculated units match the label you’ll record.
Convert a mass concentration into molarity
To convert mass concentration to molarity, divide the mass concentration in g/L by the confirmed molecular weight in g/mol:
Concentration (mol/L) = mass concentration (g/L) ÷ molecular weight (g/mol)
Illustrative example: Assume a hypothetical mass concentration of 0.5 g/L and a confirmed molecular weight of 2,500 g/mol. The calculation is 0.5 g/L ÷ 2,500 g/mol = 0.0002 mol/L, or 200 µM. Both inputs are illustrative, not specifications for a particular peptide.
Don’t use an assumed molecular weight if the peptide’s sequence, modification or salt form is uncertain. Verify the applicable value against the relevant product or batch records before converting. Laboratory buyers reviewing research-grade peptide options can find supplier information from Eternal Peptides Wholesale; that information does not establish suitability for a specific assay.
How to calculate peptide dilutions for assay working concentrations
Use C1V1 = C2V2 to plan a dilution when the stock and target concentrations use compatible units. C1 is the starting stock concentration, V1 is the stock volume to transfer, C2 is the required working concentration, and V2 is the final volume of the diluted solution. Keep volume units consistent, for example, use microlitres for both V1 and V2.
For an illustrative direct dilution, to prepare 1 mL of 10 µM solution from a 100 µM stock: V1 = (10 µM × 1 mL) ÷ 100 µM = 0.1 mL, or 100 µL. Add diluent to bring the solution to a final volume of 1 mL. This example demonstrates the calculation only; follow validated research protocols for peptide-specific preparation.
Plan direct and serial dilutions
A direct dilution is suitable when the required transfer volume is practical to measure and the target volume is manageable. For a concentration series, serial dilution can produce a planned range through repeated, defined transfers. Each step also carries forward variation from the previous step, so use an appropriate pipette and mix consistently. Avoid transfer volumes that are too small for reliable handling.
Example of a generic 1:2 serial dilution using equal volumes at each step:
- Starting solution: 100 µM stock.
- Step 1: Transfer 500 µL stock into 500 µL diluent, giving 1 mL at 50 µM.
- Step 2: Transfer 500 µL of the 50 µM solution into 500 µL diluent, giving 1 mL at 25 µM.
- Step 3: Transfer 500 µL of the 25 µM solution into 500 µL diluent, giving 1 mL at 12.5 µM.
Label each tube with its concentration and record the transfer sequence. Calculating peptide concentrations for assays means tracking the dilution path, not just the final number.
Account for concentration changes in the assay well
The working solution’s concentration isn’t necessarily the concentration in the well. Calculate the well concentration from the amount of peptide added and the total final volume, including peptide solution, cells, buffer and any other reagents. For example, adding 20 µL of a 10 µM working solution to a well with a final volume of 100 µL gives 2 µM peptide in the well: 10 µM × 20 µL ÷ 100 µL.
Use the assay protocol’s final-volume convention. Confirm whether its stated target refers to the prepared working solution or the complete well after all additions, and document the volumes used for each condition.
How to check assay concentration calculations and prevent common errors
A calculation is only as dependable as its inputs. Before using a stock or dilution in an assay, check the units, volume basis and peptide information used. If the actual net peptide content has not been established, label the result as an estimate.
- Units: Confirm that the mass and volume units produce the concentration unit you intend to report.
- Final volume: Check that the denominator is the final solution volume, not automatically the volume of diluent added.
- Molecular weight: Verify the value against the relevant peptide sequence, modification and salt form before converting to molarity.
- Dilution arithmetic: Recheck the transfer volume, diluent volume and dilution factor at each step.
- Assay conditions: Confirm whether the protocol’s concentration refers to the prepared solution or the complete assay mixture.
Avoid common unit, volume and purity assumptions
Chromatographic purity and net peptide content describe different properties. HPLC area percentage indicates the relative chromatographic signal attributed to components under the method used. It is not, by itself, a validated correction factor for the actual peptide mass in a vial. Water and counterions can contribute to gross powder weight, so don’t assume that stated purity equals net peptide content.
Review product documentation for the basis of the stated amount and batch-specific information, such as identity and purity results. If net content has not been quantified, record that limitation instead of presenting a mass-based calculation as an exact measured concentration. Amino acid analysis can be used to determine peptide content when accurate quantification is required.
Solubility, adsorption to labware, solution stability and compatibility with the assay matrix can also affect how a prepared solution performs. These are protocol-dependent variables that arithmetic alone cannot confirm. Check the validated research protocol and relevant documentation before preparation.
Make calculations traceable and repeatable
When calculating peptide concentrations for assays, retain enough detail for another researcher to retrace the work. Record the peptide identifier, batch documentation, calculation date and preparer, along with the stock concentration, each dilution step, the diluent and the final assay volume. Include assumptions, such as whether the stated vial amount represents net peptide content.
Before preparing solutions, independently check the arithmetic or use a validated spreadsheet with reviewed formulas. Compare the result with the protocol’s target and confirm that each transfer is practical to measure. A clear record helps distinguish an input or documentation issue from a calculation error.
For laboratory buyers reviewing research-use peptide information, Eternal Peptides Wholesale provides supplier information. Check product details against applicable batch records. Products are for research purposes only, not human consumption or medical use.
A repeatable peptide concentration workflow for research assays
A reproducible result starts before the calculation. Review the applicable product and batch documentation, then follow the assay’s validated research protocol for peptide-specific preparation, solvent, handling and concentration requirements. Product information can support input checks, but product supply does not validate a particular assay or establish that a peptide is suitable for it.
Use a preparation record for each assay run
Keep a record that allows another researcher to reconstruct how the final concentration was obtained. Capture:
- Peptide identity and batch reference, with the relevant product documentation.
- Input mass, the basis of that amount, final stock volume and calculated stock concentration.
- Diluent, each transfer and dilution step, and the resulting working concentration.
- Final assay volume and the concentration convention used by the protocol.
- Calculation date, preparer, assumptions, deviations and relevant observations.
Distinguish calculated values from measured or independently verified values. If net peptide content is uncertain, record that limitation rather than presenting the concentration as exact. A clear preparation record makes it easier to identify whether a difference between runs came from an input, dilution step or assay condition.
When to verify inputs before preparing solutions
Pause before preparation if the identity, molecular weight, salt form or basis of the stated peptide content is unclear. Check applicable product and batch records, and confirm the assay protocol’s requirements for solvent, concentration range, sample addition and final-volume convention. Use the protocol’s validated instructions for solubility, stability and compatibility. Don’t substitute a generic preparation assumption for peptide-specific directions.
For a broader assessment of documentation and batch checks, consult your laboratory’s research peptide quality assurance guidance. A bulk peptide sourcing guide can also help structure procurement checks, but neither supplier selection nor sourcing information replaces assay-specific validation.
In practice, calculating peptide concentrations for assays is most reliable when each input is documented, units and volumes are checked, and the final value is recorded with its assumptions. Australian laboratory buyers seeking research-use wholesale supply can find information from Eternal Peptides Wholesale. Its products are for research purposes only, not human consumption or medical use; supplier information does not validate a specific assay.
Make every assay concentration traceable
Reliable assay preparation depends on more than the calculation. Keep units consistent, calculate with the intended final volume, and distinguish the prepared stock or working concentration from the concentration in the assay well. For molar conversions, verify the molecular weight and peptide form against applicable documentation.
When calculating peptide concentrations for assays, record the inputs, dilution steps and assumptions so another researcher can follow the same workflow. Check product and batch information, then use validated research protocols for peptide-specific preparation and assay requirements. Supplier information can help you review product details, but it does not validate an assay.
Eternal Peptides Wholesale is an Australian-based wholesale supplier of research-grade peptides for laboratory use. Products are supplied for research purposes only, not for human consumption or medical use. Australian laboratory buyers can review wholesale research peptide supply and check relevant product documentation before making procurement decisions.
With verified inputs and clear records, your calculations become easier to review and repeat. Build that consistency into each assay run.
Frequently Asked Questions
How do you calculate peptide concentration from mass and volume?
Divide the peptide mass by the solution’s final volume, using consistent units. For example, 2 mg of peptide in a final volume of 1 mL gives 2 mg/mL, equivalent to 2,000 µg/mL. Use the intended final volume, not automatically the volume of diluent added. If the vial’s stated mass may include water or counterions, check the product documentation to establish what amount the calculation represents.
How do I convert a peptide concentration from mg/mL to µM?
Convert the mass concentration to g/L, then divide by the confirmed molecular weight in g/mol to get mol/L. Since 1 mg/mL equals 1 g/L, a hypothetical 1 mg/mL solution of a peptide with a molecular weight of 2,000 g/mol is 0.0005 mol/L, or 500 µM. Confirm the molecular weight for the relevant sequence, modifications and salt form before converting.
What is the difference between peptide stock concentration and final assay concentration?
Stock concentration describes the prepared source solution, while final assay concentration describes the peptide concentration after all assay components have been combined. The stock is often diluted to make a working solution, which may then be added to a well with cells, buffer or other reagents. Calculate the final concentration using the total well volume and follow the protocol’s convention for when that volume is defined.
How do you calculate a peptide dilution using C1V1 = C2V2?
Use C1V1 = C2V2, rearranged as V1 = C2V2 ÷ C1. C1 is the stock concentration, C2 the target concentration, V2 the required final volume, and V1 the stock volume to transfer. Keep concentration units compatible and both volume units consistent. Add diluent to reach the final volume, rather than adding it to the stock volume.
Does peptide purity change the concentration calculation?
Chromatographic purity and net peptide content aren’t equivalent. HPLC purity describes the relative chromatographic signal attributed to components under the method used; it isn’t automatically a validated correction for the peptide mass in a vial. Check the batch documentation for the basis of stated content. If net peptide content is unknown, label a mass-and-volume calculation as an estimate based on its stated input, not an exact measured concentration.
How do I prepare a peptide dilution series for an assay?
Use the assay protocol to set the concentration range, diluent and final volumes. A direct dilution can prepare an individual target, while serial dilution creates a series through successive, defined transfers. For a generic 1:2 series, mix equal volumes of stock and diluent, then transfer an equal volume of that mixture into fresh diluent for the next step. Label each concentration and record every transfer. Follow validated research protocols for peptide-specific preparation.
What information should I record when calculating peptide concentrations for assays?
Record the peptide identity, batch reference and documentation, input mass, final stock volume, calculated concentration and units. Include the diluent, molecular weight and peptide form used for any molar conversion, plus each dilution step and the final assay volume. Note the calculation date, preparer, assumptions and deviations from the protocol. These details make calculating peptide concentrations for assays traceable and help another researcher reproduce the preparation.
Related from Eternal Peptides Wholesale
Eternal Peptides Wholesale publishes batch-specific Janoshik Analytical reports in its certificate of analysis library, so the documentation for a listed batch can be read alongside the evidence discussed in this article.
- Peptide COA library: batch-specific Janoshik Analytical reports with their verification details
- Our peptide testing standards: how independent Janoshik testing is used and reported
- Janoshik reports explained: what each test measures and its limits
- Evidence review: What are peptides used for? Synthetic peptides as research tools
- Evidence review: Synthetic peptides: manufacture, impurities and analytical verification